
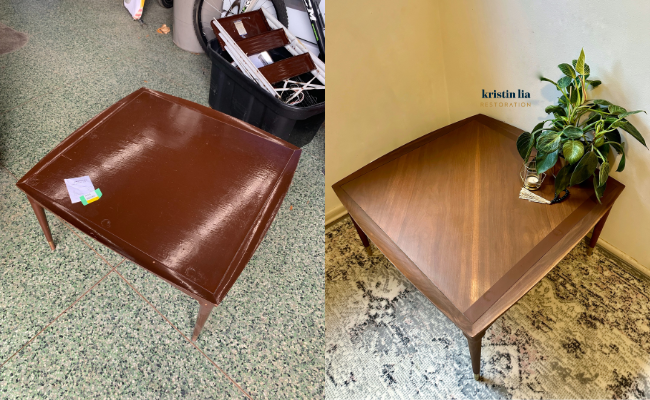
After completely screwing up the silicone in the groove, this Deilcraft table sat in an upstairs bedroom for MONTHS. I finally got back to it and finished it off!

And look at it now!

Materials:
- Cleaner (non wood surfaces): Rustoleum’s Krud Kutter
- Wood sealant: Osmo Wood Wax Finish in Walnut (3166)
- Wood sealant: Osmo Polyx-Oil Clear in Matte
- Canadians – For 10% off Osmo products, send me an email (KristinLia@rogers.com) with the products you love!
- Paint accent: Country Chic Paint – Leather Bound
Tools used:
- SurfPrep 3″X4″ electric ray sander
- DeWalt 5″ random orbit sander, variable speed
- DeWalt impact driver
- Staalmeester pointed sash brush
- Elite small round (ring) brush
- Elite washi tape (Toughtape & Sensitape)
- Osmo microfibre roller
- Osmo roller tray
- Osmo Superpad
- Osmo pad holder
- Tack cloth
- Bar rags
- Putty knife
- Safety gear- respirator, ear protection, anti-vibration gloves
- 2000 grit sand paper and sanding block
HERE ARE STEP BY STEP INSTRUCTIONS ON HOW I TRANSFORMED THIS DEILCRAFT SQUARE COFFEE TABLE:
Here’s how I refinished it:
 started by removing the the base from the top with my DeWalt impact driver
 did a test spot of Stripwell’s QCS Finish Remover; when I saw that the finish was lifting, I sprayed the entire surface twice, waiting 15-30 between each coat
 soooo, I fell asleep and the surface dried; to remedy this, I gave the surface another light spray, waited 15 minutes
 using a putty knife, a fine wire brush and steel wool, I gently removed as much of that finish as I could
 when done, I removed the excess and sprayed QCS Surface Cleanser to remove any residue before sanding
 used a combination of my DeWalt random orbit sander and SurfPrep 3×4 electric ray sander to remove the rest of that finish
- for my DeWalt, started with 100 grit on medium speed and smoothed with 150
- for the SurfPrep, I used a 100 grit film on an interface pad and then smoothed with a 5mm ProFoam pad in medium
 removed the dust with a tack cloth
 used Elite washi tape to protect the brass tips
 applied Osmo Wood Wax Finish in walnut using an Elite ring brush for the edges and a microfibre roller for the flat surfaces
 there were these weird circles, so I went back and filled them with walnut wood filler
 let dry
- sanded the areas smooth using my SurfPrep sander
- removed the dust with a tack cloth
- to make the surface more cohesive, I applied Osmo Polyx-Oil Tints in Honey
- let dry for 24 hours
- gave all the surfaces a light sand with a 400 grit foam pad (to keep the surface smooth!) and removed the dust with a tack cloth
 applied Osmo Polyx-Oil Clear in matte using the same process
- let dry for 8 hours and gave everything another light sand

 for the third (and final coat), I buffed in the oil using an Osmo Superpad
- the circles didn’t blend into the wood as well as I thought so I decided to do a paint accent
- lined the edges with Elite washi tape in delicate (Sensitape)
 painted several coats using Country Chic Paint’s Leather Bound using a Staalmeester pointed sash brush
 buffed in Osmo Polyx-Oil to seal the paint
 finished the surfaces with Grandpa Ernie’s sanding method
- there was a groove along the inside edge so decided to use silicone to fill…BIG MISTAKE. I tried to wipe off and just made it worse. So o brought it to one of my upstairs bedrooms and left it there…for many months.
 when I finally decided to get back to it, I started by using my Mozart blade to scrape out as much of that silicone as possible
 when done, I used my SurfPrep sander to remove that shine left by the silicone
- removed the dust with a tack cloth
 applied two coats of Polyx-Oil – first with the brush/ roller combination and the second by buffing
- again finished the surfaces with Grandpa Ernie’s sanding method
- reattached the base to the top
I’m so happy that I walked away and then returned to this piece with fresh motivation! I love how it turned out.


I'd love to know what you think!