
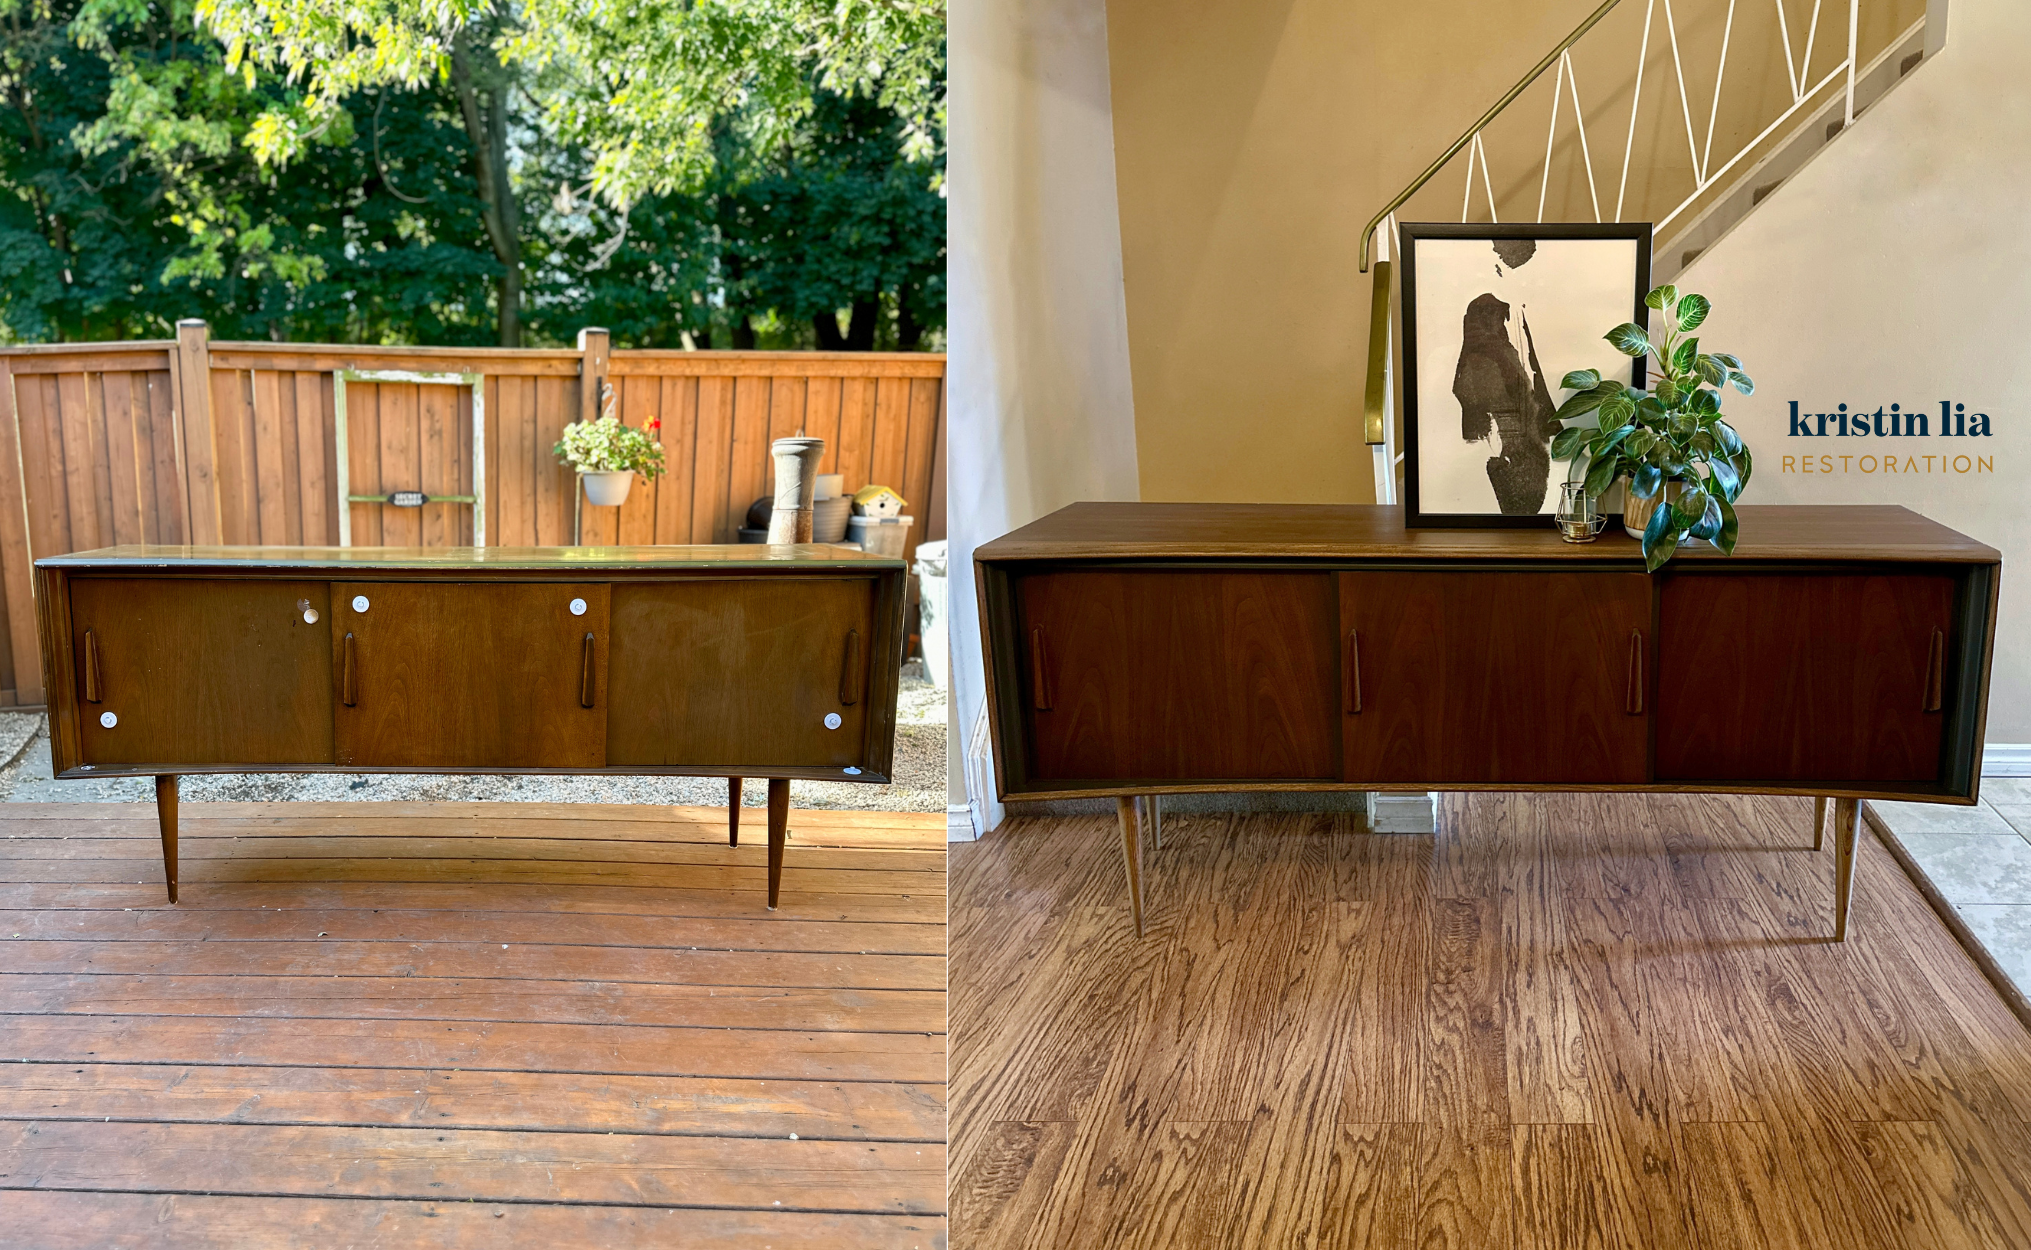
I literally jumped to get this MCM credenza when I saw it on Facebook Marketplace. I could just see it bursting with potential!

And look at it now!

Materials:
- Cleaner (non wood surfaces): Rustoleum’s Krud Kutter
- Sticker removal: GooGone
- Furniture stripper:
- Stripwell QCS Finish Remover & Surface Cleaner
- Circa 1850’s Heavy Paint & Varnish Remover
- Wood sealant: Osmo Wood Wax Finish in Oak Antique (3168)
- Wood sealant: Osmo Polyx-Oil Clear in Matte
- Canadians – For 10% off Osmo products, send me an email (KristinLia@rogers.com) with the products you love!
- Paint accent: Country Chic Paint – Dark Roast
- Wood paint touch-up: Coconix Furniture Repair Paint
Tools used:
- SurfPrep 3″X4″ electric ray sander
- DeWalt 5″ random orbit sander, variable speed
- DeWalt cordless drill
- DeWalt cordless vacuum
- Bahco 1” carbide tipped pocket scraper with the triangle shaped blade
- Country Chic Paint Artist Detail brushes
- Mozart P1 Precision Knife
- Elite small round (ring) brush
- Elite washi tape
- Osmo microfibre roller
- Osmo roller tray
- Osmo Superpad
- Osmo pad holder
- Tack cloth
- Bar rags
- Putty knife
- Safety gear- respirator, ear protection, anti-vibration gloves, Suadex safety boots
- 2000 grit sand paper and sanding block
HERE ARE STEP BY STEP INSTRUCTIONS ON HOW I TRANSFORMED THIS DEILCRAFT MID-CENTURY MODERN CREDENZA:
Disassembly, Drilling Pilot Holes & Preparing the Surface
Here’s how I disassembled and cleaned up this piece to get started:
 the back left leg had come loose and the holes were too wide to reinstall
 decided to remove all the legs before drilling new holes
 used a pencil to mark out the new hole locations
 used my DeWalt cordless drill to create pilot holes
 these are a path for the screw to follow so that the wood isn’t split
 used my cordless vacuum to clean up the shavings and the cobwebs
  that were on the bottom
 to remove the drawers, wiggled a putty knife in between the top frame and the spring tension clip; this easily removed them
- tried unscrewing one of the handles but it would not come off; so reinstalled the screws
- used my cordless vacuum to clean up the shavings and the cobwebs that were on the bottom
 put the piece right side up
- removed the two small screws that kept the drawer from falling out
 there had been child locks installed on the doors and a sticky substance remained; to remove, I sprayed GooGone and let it sit for a few minutes
- used a putty knife to gently scrape the gunk
 wiped any remaining residue using a blue shop towel
Disassembling as much as possible really does make sanding and applying sealants so much easier in the long run.
Trying to Sand; Pivoting to using Stripwell QCS Finish Remover
With as much of the piece disassembled as I could, it was time to sand!
Here’s how I started (and then quickly switched plans):
 started by putting on all my safety gear
 began sanding with my DeWalt random orbit sander using 100 grit on medium speed
 THIS FINISH WAS SO THICK
 switched plans and liberally sprayed Stripwell’s QCS Finish Remover over the entire surface
- as that worked its magic, sanded the original finish from the doors being very careful around those handles
- used a putty knife to test the finish; it wasn’t lifting (yet) so I sprayed another round
 because it gets dark earlier, brought the piece inside to continue to work
- gave it one more test, sprayed one more round and waited 45 minutes
 this time used a combination of steel wool and the putty knife and very little of the finish lifted
 QCS works on 60- 70% of finishes, this just didn’t seem to be one of them
- removed the QCS excess using a blue shop towel
 sprayed QCS Surface Cleanser to make sure none of the Finish Remover residue was on the surface
 let dry
 because I was so frustrated, I got to sanding the legs, doors and handles
- used my SurfPrep Sanding 3×4 electric ray sander with a 100 grit film on an interface pad- being very careful around the handles
- smoothed out all of the surfaces using a 5mm ProFoam pad in medium
I’m really hoping that some of that finish loosened to make sanding easier
Trying to Sand (AGAIN!); pivoting to use Circa 1850’s Heavy Paint & Varnish Remover
After trying to remove/ loosen that original finish with Stripwell’s QCS Finish Remover, I was realllllly hoping that sanding would go much more smoothly. This was not to be.
Here’s what I did next:
- put on all my safety gear including my Suadex safety boots
- tried sanding yet again and it was a nightmare; this finish would not lift- I even switched to 80 grit
 eventually I realized that I needed to try Circa 1850’s Heavy Paint & Varnish Remover
- THIS PRODUCT IS SO BAD FOR YOUR HEALTH

 I made sure to put on long sleeves, long pants, industrial gloves and my respirator
 poured the gloopy product onto the surface and used a chip brush to spread over the surface
- because it was a windy day, I covered the surface with plastic wrap so that it wouldn’t dry out
- after it had time to work, I used my putty knife to lift as much of that raised finish as I could
 when done, wiped any remaining stripping residue with mineral spirits
- after the surface dried and I was about to bring it inside, I noticed one little corner that I thought I could lift; using a putty knife, I managed to remove a large amount of that finish!!
- removes the shavings using my cordless vacuum
I HATED having to use this very toxic product but in this circumstance, it was the only thing that would get that finish to lift. It contains Methylene chloride which has extremely bad effects without the proper PPE. With a lot of that finish now removed, it’s time to sand!
Time to sand – for real!
FINALLY, it’s time to sand! With as much of that original finish removed as I could, I was so happy to be at this step.
Here’s how I sanded:
- made sure I was wearing all my safety gear
- used my DeWalt random orbit sander starting with 80 grit
 seeing that gorgeous walnut grain emerge made all the
  worth it!
- switched to 100 grit to continue smoothing the surface
 after bringing the piece inside, I used my Bahco 1” carbide tipped pocket scraper with the triangle shaped blade to nudge up against the edge to remove the rest of that finish
- switched over to using my SurfPrep Sanding 3×4 electric ray sander to smooth out those delicate surfaces; started with a 100 grit film on an interface pad but then switched to using it with just the pad saver
- finished all of the surfaces using a 5mm ProFoam pad in medium
- when done, used my cordless vacuum to remove as much of the sanding dust as possible
- thoroughly cleaned the inside and back of the doors using Rustoleum’s Krud Kutter; sprayed, let sit a minute and then scrubbed with a bar rag
 changed the water, got a new rag and rinsed any remaining residue
Now it is time to start on the paint accent!!
Creating a paint accent with Country Chic Paint & Elite washi tape
There were a couple of spots around the handles where I sanded just a little too much and went through the veneer. Also, that inside front edge was going to be a nightmare sand so a paint accent was a perfect choice. It also modernizes a piece when it is tastefully done.
Here’s how I added the paint accent:
 started by framing the areas I would be applying the paint to using MakoElite’s Goldtape – on the sides of the handles and the inside front frame
- cut those sharp edges using my Mozart P1 Precision Knife
 chose Country Chic Paint’s Dark Roast – a deep espresso like brown with some green undertones
- applied using the largest of the CCP artist detail brushes
 used a flashlight just to make sure I wasn’t missing any spots
- let dry overnight (but only a few hours needed)
 applied a second coat with the same process and the coverage was perfect! That’s all that was needed.
- removed the tape
This colour, Dark Roast, always pairs so beautifully with walnut wood.
Application of Osmo wood sealant- Wood Wax Finish in Oak Antique
This is always one of my favourite parts- adding the sealant to the wood. I chose a new Wood Wax Finish from Osmo- Oak Antique. Another refinisher (and friend!) @amberly_reimagined, used it on a piece and I loved how it looked.
Here’s how I applied the wood sealant:
- gave the product a good stir and poured into a tray
- this is important because there are things that settle on the bottom that need to be incorporated in order for it to work the way it’s supposed to
 for the edges, applied using an Elite ring brush and a microfibre roller for the flat surfaces
- I applied a very thin coat by squeezing out as much of the product as I possible – from both the brush and the roller. Doing this correctly ensures the proper dry time and maximum durability for each coat.
- let dry for 24 hours
I have been looking for the perfect shade for the elm grain and this is 1000% it. I will absolutely be using it on future projects.
Problem solving & Touch-ups
Sometimes things don’t always go to plan (understatement of the year, I know!). There were a few things that came up that I needed to address before applying Osmo Polyx-Oil.
Here’s what I had to do:
- sanded all the surfaces with a 400 grit foam pad
 removed the dust with a tack cloth
- realized that underneath the front edge could be visible so laid the piece on its back and marked out the accent area
- used my artist detail brush to apply Country Chic Paint’s Dark Roast to under the front edge and accent part
 touched up a few spot on the wood using Coconix Furniture Repair Paint
- also decided to paint the grooved area that ran along the top and sides so taped off that area as well
- overall applied 2 coats of paint waiting a few hours in between used a flashlight to make sure I didn’t miss any spots
- let dry for a few hours
- removed all the tape
When these things come up that can really pull a piece together- as much as they are a pain- I always make a point to do them. It’s the little things that matter!
Application of Osmo Polyx-Oil
With all the little things done, it was time to seal both the wood and the paint. Both Osmo Wood Wax Finish and Country Chic Paint are durable on their own but I always make sure to add extra durability with Osmo Polyx-Oil.
Here’s how I applied it:
- started by giving the Polyx-Oil a good stir
 used an Elite flat brush to apply the oil to the legs and edges and a microfibre roller to the flat surfaces
- let dry overnight but only 8-10 hours required
- in between each coat, lightly sanded all the surfaces with a 400 grit foam pad to keep it free of dust (and dog hair
 )
) - removed the dust with a tack cloth
- for the second coat, repeated this process
 for the third and final coat, used an Osmo Superpad to buff in the oil
I always find that adding the Polyx-Oil gives the surfaces a final, sealed look! Plus, I have the assurance that it’s completely protected.
Finishing Touches
When I started this piece, I was tempted to just give up removing that original finish and just paint it. But with lots of effort and patience, I am so happy that I stayed with it. I love how Osmo Oak Antique Wood Wax Finish looks – especially paired with Country Chic Paint’s Dark Roast.
Here’s how I finished up this gorgeous credenza:
- 👴🏻 Used Grandpa Ernie’s sanding method for all the wood surfaces for a “smooth like butter 🧈” finish; let me know if you need a further explanation

- reinstalled leg plates and put the piece right side up
 put the doors back and slightly nicked the top frame
- touched up with a little paint
- finally, reinstalled the screws that held the door in place
I am in awe of how incredible this piece turned out. Sometimes keeping with your original plan really does pan out!


I'd love to know what you think!