
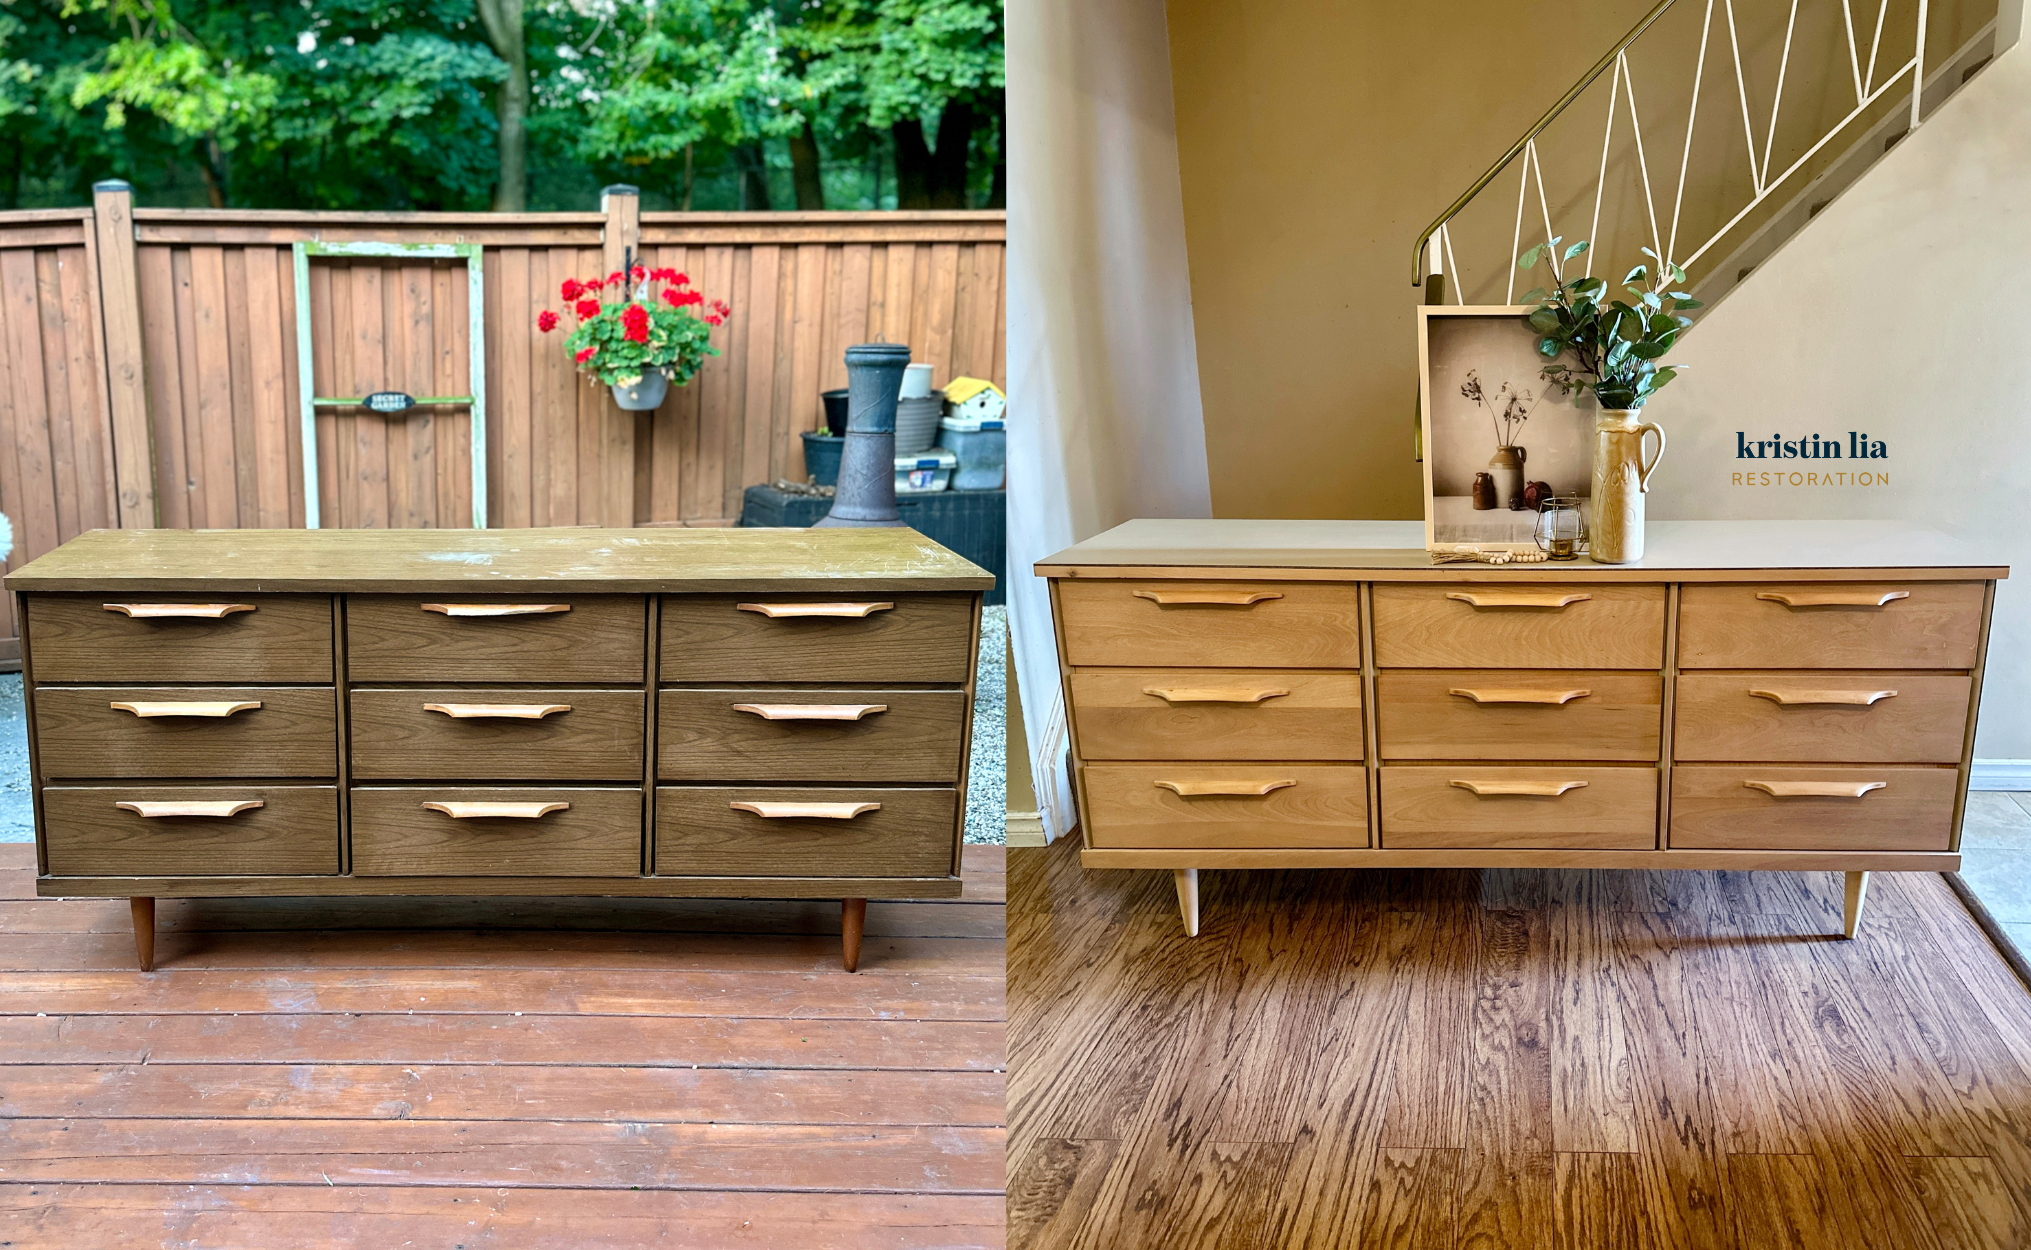
Another beauty of a Mid Century Modern 9-drawer dresser that I picked up from Lyn Jaymes Home! I did the matching chest of drawers and I know it has a laminate frame and wooden drawers. My plan is to paint the frame and sand the drawers.

Materials:
- Cleaner (non wood surfaces): Rustoleum’s Krud Kutter
- Wood sealant: Osmo Polyx-Oil Raw
- Wood sealant: Osmo Polyx-Oil Clear in Matte
- Canadians – For 10% off Osmo products, send me an email (KristinLia@rogers.com) with the products you love!
- Paint accent: Country Chic Paint – Soiree
- Wood touch-ups: Coconix Furniture Repair Paint
Tools used:
- SurfPrep 3″X4″ electric ray sander
- Dewalt 5″ random orbit sander, variable speed
- Dewalt cordless vacuum
- Zibra Palm Pro brush (save 10% when you use this link!)
- Country Chic Paint 1.5″ oval brush
- Staalmeester microfibre roller
- Country Chic Paint Artist Detail Brush
- Elite small round (ring) brush
- Elite washi tape
- Osmo microfibre roller
- Osmo roller tray
- Osmo Superpad
- Osmo pad holder
- Tack cloth
- Bar rags
- Safety gear- respirator, ear protection, anti-vibration gloves, Suadex safety boots
- 2000 grit sand paper and sanding block
How I refinished this piece:
*When scrolling through on your desktop, click on the black slide to start and pause the videos*
Here’s how I got started:
 Removed the wooden pulls
 Labeled the drawers with their drawer location
 Put the frame on its side to remove the legs
 Before sanding, I put on my safety gear including my Suadex safety boots
 Used my DeWalt random orbit sander starting with 100 grit on medium speed to remove that original finish on the drawers
- Smoothed out the drawers and scuff sanded the frame with 150 grit
 For the curved legs and pulls, my SurfPrep Sanding 3”x4” electric ray sander with its foam pads was perfect
  ; I started with a 100 grit film on an interface pad and smoothed with a 5mm ProFoam pad in medium
 Removed the dust with a tack cloth
 Vacuumed as much of the sanding dust as I could with my DeWalt cordless vacuum
 Used Rustoleum’s Krud Kutter to give the inside of the frame and the inside and outsides of the drawers (everything except the wood surfaces)
  Rinsed any remaining residue with clean water and a new rag
I was truly at loss as to what finish I wanted to use. I used Polyx-Oil Raw on the matching chest of drawers but thought I might switch it up. When I don’t have a clear design plan, my go-to is always to test.
Here’s how I tested finishes:
-
 marked out 4 squares using Elite washi tape
 - Tested the following wood sealants from Osmo:
- Polyx-Oil Raw
- Havana Oil Stain
- Polyx-Oil Tints in Black
- Polyx-Oil Tints in Honey
 used a ring brush to apply because it’s a closer match in grams to the amount of product the microfibre roller will leave on the surface
 let dry overnight
- removed the tape
- Sanded the finishes from the surface
In the end, I decided on Osmo Polyx-Oil Raw. I just love how it keeps the light maple wood looking light. To complement this gorgeous wood, I chose Country Chic Paint Soirée- a warm, mushroom beige tone.
Here’s how I painted this piece:
- Started with applying Elite to the wood areas I wanted to protect making sure the edges are pushed down
- Used a tack cloth to wipe off the surface to make sure the removal of dust and dog hair
 lined a small paint tray with foil, stirred the paint and poured into the tray
 to apply the paint to the edges, I used a 1.5” Country Chic Paint oval brush for the outside edge, Zibra Palm Pro and a Staalmeester microfibre roller for the top, flat surface
- in between all three coats, lightly sanded with a 400 grit foam pad to guarantee a smooth surface free of dust (and dog hair
 )
) - used a damp cloth to remove the dust
 for the third coat, used a flashlight
  to make sure I didn’t miss any spots
- when dry, removed the tape
Country Chic Paint is durable on its own but I always add some extra with Osmo Polyx-Oil Clear in matte.
Here’s how I sealed the paint:
 poured Osmo Polyx-Oil Clear into the tray
- for the legs and edges, applied with an Elite ring brush
 for the flat surfaces (top, sides), applied with a microfibre roller
- let dry overnight night but only 8-10 hours required
- lightly sanded all painted surfaces with a 400 grit foam pad and removed the dust with a tack cloth
- touched up a small spot with a Country Chic Paint Artist Detail brush
 Applied the second coat
- again let dry for 8-10 hours
The secret to a durable Osmo finish is to slowly build it. The last step is buffing and it’s the best way to finish!
Here’s how I buffed in the last coat of Osmo Polyx-Oil:
- Lightly sanded all surfaces with a 400 grit foam pad and removed the dust with a tack cloth
 After stirring, drizzled a modest amount of oil onto the surface; I use it as a dipping pad
 Using an Osmo Superpad (a white, non-abrasive pad) attached to a pad holder, did gentle circles with the oil until it was all absorbed into the surface
 Finished with long even strokes with the grain (or in one fluid motion in the case of paint)
- Let dry overnight
This is the moment when all my effort comes together. Seeing the paint paired with the wood all as one piece is always the best part!
Here’s how I finished off this dresser:
- 👴🏻 Used Grandpa Ernie’s sanding method for all the wood surfaces for a “smooth like butter 🧈” finish; let me know if you need a further explanation

- Paired the pulls to the drawers I felt they best matched with
- Installed the pulls
- removed the tape
- reinstalled the legs
- put the drawers back into their proper locations
Using Country Chic Paint’s Soirée for the first time and pairing it with Osmo Polyx-Oil Raw was such a good decision! Definitely a pairing that I’ll be using again. Thank you again for passing along this piece to me, Lyn Jaymes Home ![]() !
!
Here are some other in-depth videos outlining the process – step by step with my daily commentary!
PART ONE
PART TWO
PART THREE
PART FOUR
PART FIVE
PART SIX
PART SEVEN


I'd love to know what you think!