
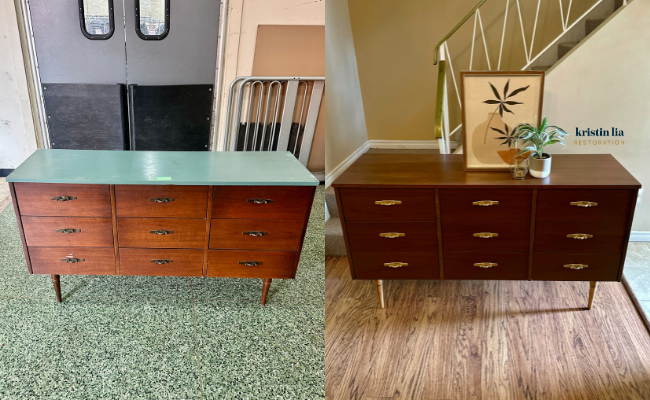
This transformation really makes so so proud! The fact that Stripwell worked SO well to remove that awful green paint and then sanding uncovered that gorgeous grain – it just goes to show you what can lie underneath if you put in the effort.

Materials:
- Stripwell QCS Finish Remover & Surface Cleaner
- For patching: Bondo filler
- Cleaner (non wood surfaces): Rustoleum’s Krud Kutter
- Wood sealant: Osmo Polyx-Oil Tints in Amber
- Wood sealant: Osmo Polyx-Oil Clear in Matte
- Canadians – For 10% off Osmo products, send me an email (KristinLia@rogers.com) with the products you love!
- Paint accent: Country Chic Paint – Leather Bound
- Wood touch-ups: Coconix Furniture Repair Paint
- Cleaning (hardware): Blue Dawn dish soap
- Paint (hardware): MTN Hardcore – Oro Gold
- Sealer (hardware): MTN Acrylic Varnish
Tools used:
- Dewalt 5″ random orbit sander, variable speed
- Dewalt cordless vacuum
- Zibra round brush (save 10% when you use this link!)
- Elite small round (ring) brush
- Elite washi tape
- Osmo microfibre roller
- Osmo roller tray
- Osmo Superpad
- Osmo pad holder
- Tack cloth
- Putty knife
- Steel wool- #0000
- Bar rags
- Safety gear- respirator, ear protection, anti-vibration gloves, Suadex safety boots
- 2000 grit sand paper and sanding block
How I refinished this piece:
*When scrolling through on your desktop, click on the black slide to start and pause the videos*
- ⚠️ Started by mixing Bondo (wearing my respirator to protect my lungs 🫁) and applying to damaged areas
- 💃🏽 While that dried, I liberally sprayed Stripwell’s QCS Finish Remover on the entire top surface; waited 15 minutes
- 😍 It worked so well just after the first round!!
- 🔪 Used a putty knife to gently remove that paint on top to reveal that gorgeous walnut wood 🪵
- 💃🏽 Gave another light spray and then used #0000 steel wool to remove the remaining original finish from the grain
- 🧼 Removed any remaining Finish Remover with QCS Surface Cleanser
- 🏝️ On the Bondo repaired areas, sanded with my DeWalt random orbit sander using 80 grit
- 🏝️ For the rest of the wood surfaces, I started with 100 grit on medium speed (lower speed for the edges); smoothed with 150 grit
 Used my Surfprep 3×4 electric ray sander to remove the finish on the legs with a 100 grit film with an interface pad then the 5mm ProFoam pad a medium 5mm ProFoam pad to smooth them out
- 🌪️ Vacuumed as much of the sanding dust using my cordless vacuum
- 🧼 Used Rust-Oleum’s Krud Kutter to really give the inside of the frame and inside & outsides of the drawers a good clean
- 📌 Removed the dust from the wood surfaces using a tack cloth
- 📼 Taped off the edges with Elite washi tape to create a paint accent
- 🎨 Painting the accent with Country Chic Paint’s Leather Bound; did 3 coats
- 🪵 Applied Osmo’s Polyx-Oil Tints in Amber to seal the wood
- 🏝️ Lightly sanded with 400 grit foam pad (to ensure a super smooth surface)
- 📌 Removed dust with a tack cloth
- 🪵 Applied 2nd coat using Polyx-Oil Clear using the same brush/ roller combination
- 💨 Let dry overnight (but only 8-10 hours required)
- 🎨 Touched up a couple of spots using Coconix Furniture Repair paint
- 🏝️ When dry, lightly sanded with 400 grit foam pad
- 📌 Removed dust with a tack cloth
- 🪵 Buffed in the third (and final) coat using Polyx-Oil Clear using an Osmo Superpad
- 💦 To clean hardware, combined a 1:1 mixture of water and white vinegar with a couple of drops of blue Dawn dish soap
- 🥵 When the water boiled, I added the hardware and let boil for 10 minutes
- 🧼 Scrubbed with a very fine wire brush and #0000 steel wool
- 🌬️ Dried by hand to avoid water spots
- 🎨 The brass was discoloured and to even it out, I used MTN (Montana Colors)- making sure to wear a respirator to protect my lungs 🫁
- 🏆 Started by spraying with MTN Hardcore in Oro Gold; applied 2 coats and waited 15 minutes in between each
- 🤍 For extra protection, finished by spraying with MTN Acrylic Varnish; let dry outside all day
- 🦵🏼 Reinstalled legs
- 📼 Removed tape
- 👴🏻 Used Grandpa Ernie’s sanding method for all the wood surfaces for a “smooth like butter 🧈” finish; let me know if you need a further explanation 😃
- 🪛 Reinstalled the hardware
I am ELATED with how this turned out. Please take this as a sign that there is often more to a piece than what you first see.
Here are some other in-depth videos outlining the process – step by step with my daily commentary!
PART ONE
PART TWO
PART THREE
PART FOUR


I'd love to know what you think!