
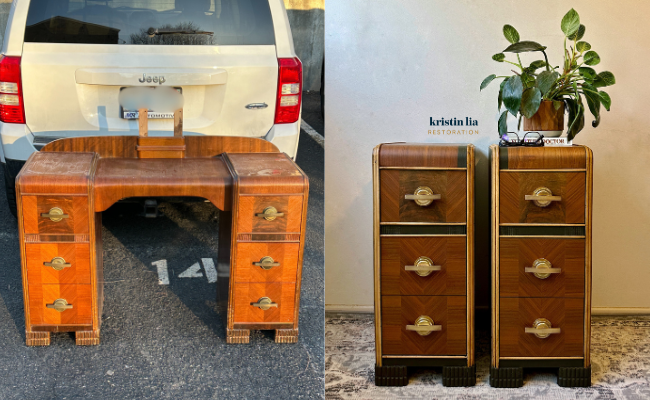
When I saw this Art Deco vanity on the curb when I was walking Milo & Jack, I knew it was my perfect opportunity to try my hand at converting them into nightstands. I hadn’t attempted it before and knowing that it was free, I crossed my fingers the whole way home that it wouldn’t be picked up by someone else before I got back 🤞🏼

Materials:
- Wood sealant: Osmo Wood Wax Finish in Walnut
- Wood sealant: Osmo Polyx-Oil Tints in Honey
- Wood sealant: Osmo Polyx-Oil Clear in Matte
- Canadians – For 10% off Osmo products, send me an email (KristinLia@rogers.com) with the products you love!
- Paint accent: Country Chic Paint – Dark Roast
- Rustoleum Krud Kutter
- Elmer’s tinted wood filler in walnut
- Bondo Filler
- Coconix Furniture Repair Paint
Tools used:
- Dewalt 5″ random orbit sander, variable speed
- Dewalt cordless vacuum
- Dewalt multi-tool
- Bahco 1″ pocket scraper with triangle shaped blade
- SurfPrep 3″X4″ electric ray sander (for those curved front edges)
- USA buyers – click here to save 10% off your next order; or use code KRISTINLIA at checkout! 5% of your purchase will support AARF (a local animal rescue group)
- Zibra precision cut-in brush (2″ short handle) (using this link will directly support Animal Angel Rescue Foundation)
- Elite small round (ring) brush
- Elite washi tape
- Osmo microfibre roller
- Osmo roller tray
- Osmo Superpad
- Osmo pad holder
- Mozart precision knife
- Tack cloth
- Safety gear- respirator, ear protection, anti-vibration gloves, Suadex safety boots
- 2000 grit sand paper and sanding block
How I refinished this piece:
*When scrolling through on your desktop, click on the black slide to start and pause the videos*
 Removed the hardware
- Disassembled the top and middle pieces
 Used my Dewalt multi-tool to cut the back piece that connected both sides
 Filled in damaged areas with Bondo; MAKE SURE TO WEAR A RESPIRATOR
 Scraped the edges using my Bahco 1” carbide tipped pocket scraper with triangle shaped blade
 For the Bondo areas, sanded with 80 grit
- For the other flat surfaces of the drawers and frame and legs with my Dewalt random orbit sander using a 100 grit
- Smoothed out the surfaces with 150 grit
 For the curved edges and areas that I was going to be painting, I sanded with my SurfPrep Sanding 3×4 electric ray sander; started with a 5mm ProFoam pad in medium and smoothed with fine
 Cleaned the insides of the frame and drawers with Krud Kutter
 Removed the wood dust with a tack cloth
 Because I was doing a paint accent over the repaired areas, I taped the areas with Elite washi tape
 I applied 2 coats of Country Chic Paint’s Dark Roast using a Zibra 2” short handle angle brush for the edges and a CCP 1.5” oval round brush
 Sealed the paint & wood with Osmo’s Polyx-Oil Tints in Honey using an Elite flat brush for the edges and a microfibre roller for the flat areas; I waited 24 hours between coats
- Sanded with a 400 grit foam pad between all coats; removed dust with a tack cloth
- For coat
 , applied Osmo’s Polyx-Oil Clear in matte; waited overnight but only 8-10 hours required
 - For coat
 , buffed in the Polyx-Oil Clear in matte using an Osmo Superpad; this means that I did gentle circles with the oil until it was all absorbed into the surface; waited 8-10m hours for the finish to dry
 - Cleaned the hardware by boiling in a 1:1 mixture of water & white vinegar; seeing that brass sparkle again was SO GOOD
- 👴🏻 Finished the surfaces with Grandpa Ernie’s method; let me know if you need a further explanation 😃
I LOVE being able to try new things. This gave me the opportunity to use tools I have and skills I’ve learned to even attempt this. For that, I am so grateful!


I'd love to know what you think!