
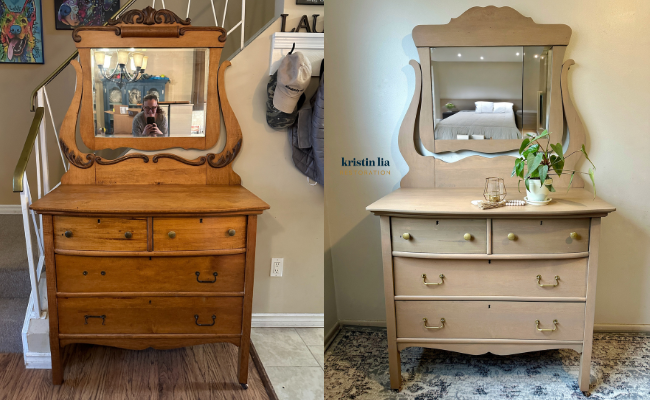
This antique dresser has been in my friend Jane’s family for generations. She recently moved and no longer had space for it but also wanted to make sure it was taken care of. What an incredible honour that she trusted me to ensure its legacy.

Products:
- Wood wax finish: Osmo – 3132 Grey Beige
- Wood Sealant: Osmo – Polyx-Oil Clear in matte
- Canadians – For 10% off Osmo products, send me an email (KristinLia@rogers.com) with the products you love!
- Hardware paint: Rustoleum Vintage Gold spray paint
- Cleaner: Krud Kutter Gloss-Off
Tools used:
- Bahco 1″ pocket scraper with pear & triangle shaped blades
- Dewalt cordless vacuum
- Dewalt 5″ random orbit sander, variable speed
- SurfPrep 3″X4″ electric ray sander
- Elite washi TOUGHTAPE
- Elite washi SENSITAPE
- Elite microfibre roller
- Elite round brush
- Osmo pad applicator
- Osmo Superpad
- 400 grit foam sanding pad
- Tack cloth
- Safety gear- respirator, ear protection, anti-vibration gloves, Suadex Salant safety shoes
- 2000 grit sandpaper and sanding block
How I refinished this piece:
*When scrolling through the Instagram posts on your desktop, click on the black slide to start and pause the videos*
Step by step instructions
 Started removing the top from the frame (to make sanding easier) and the hardware from the drawers and mirror
 Removed the decorative pieces from the mirror carefully (I thought I was going to save them) using a putty knife and small tack lifter
 Thoroughly cleaned the entire piece – using a dental pick to get into all the crevices and Krud Kutter to completely remove the invisible grime; rinsed residue with clean water and new rag
 Used my Bahco 1” pocket scraper with triangle & pear shaped blades to remove finish from the edges of the sides of the frame and front edges of the piece
 Sanded flat surfaces of the drawers, frame and legs with my Dewalt random orbit sander starting with 100 grit and smoothing with 150 grit
 Used my Surfprep 3×4 electric ray sander with a medium 5mm ProFoam pad to remove the rest of the finish from those detailed areas
 For extra thick finish on top and mirror frames, I first applied Stripwell’s QCS Finish Remover; I let sit for 15 minutes, checked, reapplied, waited again and then the magic happened!
 I used a putty knife it remove and then cleaned the surface with Stripwell’s QCS Surface Cleanser
- Sanded smooth with my orbit sander
 Brought upstairs and removed the dust with a tack cloth; realized the top had swirl marks so after putting on my Suadex safety running shoes, I re-sanded it
  After doing some testing, I applied Osmo’s Wood Wax Finish in Grey Beige using a fleece applicator
 I adore what a smooth finish it left!
 After waiting overnight (but only 12 hours required!), I applied Osmo’s Polyx-Oil Clear for extra durability
 Used the flat brush and Elite microfibre roller combination; waited 8-10 hours for the finish to dry
- Sanded with a 400 grit foam pad between coats; removed dust with a tack cloth
- For coat
 , buffed in the Polyx-Oil using an Osmo Superpad
 - Cleaned the original hardware by boiling in a 1:1 water to white vinegar mixture for 10 minutes; scrubbed with a very fine wire brush and dried by hand to avoid water spots
 For a more consistent finish, I used Rustoleum’s Vintage Gold spray paint
 I also lined the drawers with peel & stick wallpaper from Amazon
- 👴🏻 Finished drawers with Grandpa Ernie’s method; let me know if you need a further explanation!
- Reinstalled the top and hardware
It is truly my hope that this piece will continue to make memories in its new home. I’m so lucky that I got to be a small part of it ![]()


I'd love to know what you think!